
Customer Documentation: Neonode® Touch Sensor Module User's Guide : .I2C Mouse pad and Keyboard v2.2
The Touch Sensor Module can be used to send keyboard or mouse input to a computer through I2C. An example of how this can be achieved is included in the Arduino Library example zForceKeyboardMouse. The example uses the official Arduino libraries
The Touch Sensor Module can be placed as an in-air solution or on any surface, providing plenty of alternatives for a wide range of users. The sensor module can for instance be configured to work as a personalized control panel, or mixer board. Due to the customizable layout and controls, It could be used in development, as well as assisting people who needs a customized workspace.

Description
The zForceKeyboardMouse example showcase how touch input can be converted as mouse or keyboard input. The example enables SAMD micro based boards (e.g. Neonode Prototyping Board) to send keystrokes or mouse navigation to the host system by using the official Arduino libraries
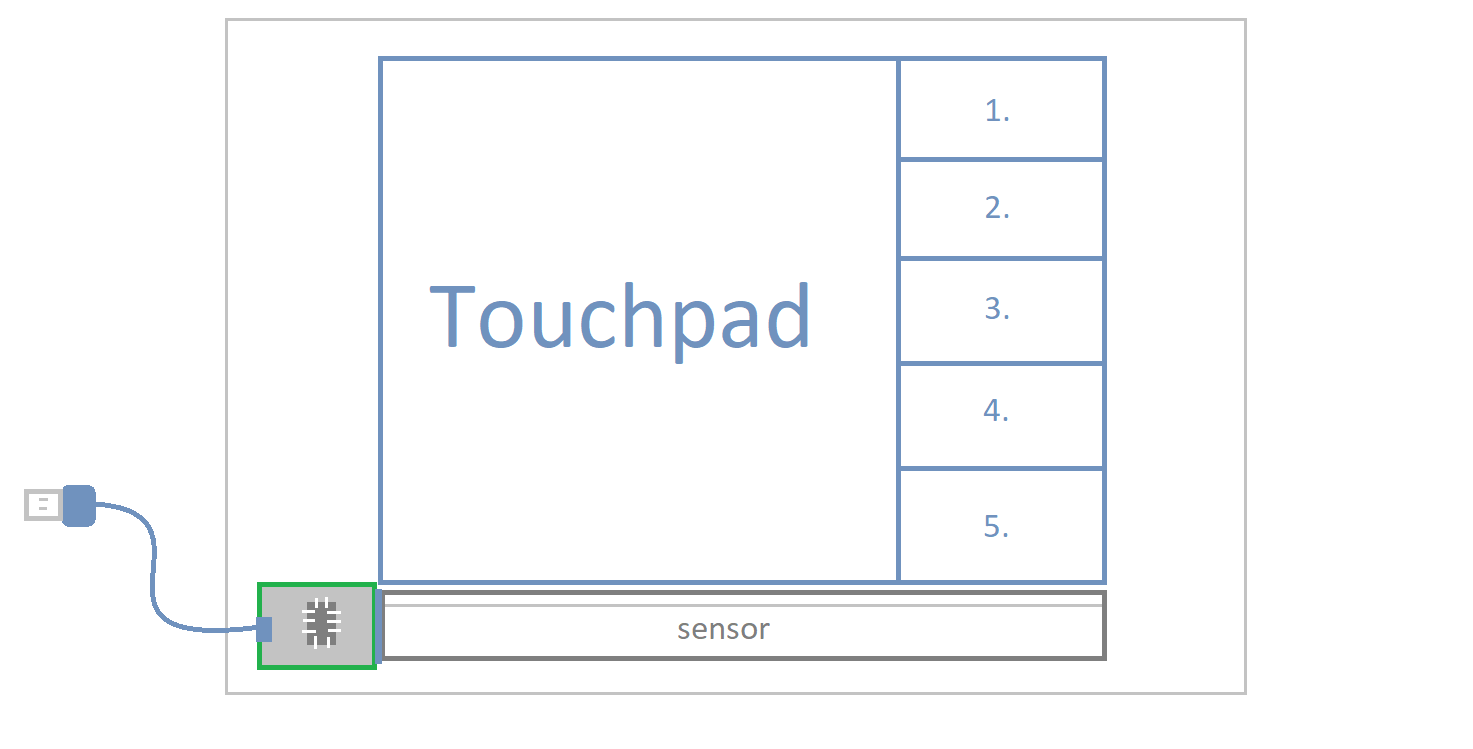
The example divides the Touch Active Area into one mouse pad and a keyboard section, containing 5 buttons (A-E). The mouse section works like a relative mouse pad, where the cursor moves relatively to its previous position. The Keyboard buttons are programmed to print the letters A-E when a touch is being preformed in each corresponding section.
We can access the touch data from the sensor module through the zForce Arduino library
int16_t x = ((TouchMessage*)touch)->touchData[0].x; //Touch input position x coordinateint16_t y = ((TouchMessage*)touch)->touchData[0].y; //Touch input position y coordinateint8_t event = ((TouchMessage*)touch)->touchData[0].event; //Touch input event state, i.e TouchUp, TouchDown...
Touch handling Mouse Pad
Since the Touch Sensor Module is recognized as a touch screen digitizer, the touch input data needs to be extracted in order to translate it as mouse input. To translate the absolute position input coordinates to its relative position (movement), we subtract the current touch data position with the previous tracked object position.
Mouse.move((x - previousTouch.x), (y - previousTouch.y)); //"x" and "y" are the location of the reported touch coordinates //"previousTouch.x" and "previousTouch.y" are the location of the // previous reported coordinate.
A left-click mouse action is preformed once "tapping" or "clicking" withing the mouse section. The left-click action is fired when a reported touch has the event data "UP". In practice, this means that the end user would needs to both "press" and "release" their finger in order to preform a touch. The touch sensitivity can be adjusted by the global variable holdTime, which acts like a timer for how long a "touch" can take.
In order to use the mouse pad, we use the collected touch information from the sensor module:
switch (event) { case 0: // DOWN event previousTouch.x = x; previousTouch.y = y; globalMillis = millis(); Serial.println("Mouse Input - DOWN"); break; case 1: // MOVE event if ((millis() - globalMillis) >= holdTime) { Mouse.move((x - previousTouch.x), (y - previousTouch.y)); Serial.println("Mouse Input - Moving cursor"); } previousTouch.x = x; previousTouch.y = y; break; case 2: // UP event Serial.print("Mouse Input - UP"); if (millis() - globalMillis < holdTime) // mouse "left click", sensitivity { // can be tuned by changing "holdTime" Mouse.click(MOUSE_LEFT); Serial.print("(Left-Click)"); } Serial.println(""); break; default: break; }
In-Air Adjustment
For in-air solutions, we recommend to preform all "left-clicks" or "key presses" on the DOWN-event instead of the UP-event. By making this adjustment, the left-click will be fired when the end user press down their finger (instead of when releasing). This gives the Touch Active Area a more tactile response, which is optimal for in-air solutions
To make a left-click trigger on the DOWN-event instead, please consider the following adjustments:
switch (event) { case 0: // DOWN event previousTouch.x = x; previousTouch.y = y; globalMillis = millis(); Mouse.click(MOUSE_LEFT); //Left-click on DOWN-event break; case 1: // MOVE event if ((millis() - globalMillis) >= holdTime) { Mouse.move((x - previousTouch.x), (y - previousTouch.y)); } previousTouch.x = x; previousTouch.y = y; break; case 2: // UP event break; default: break; }
Touch Handling Keyboard
The keyboard buttons will send a key press depending on the position of the touch object. Each buttons are sectioned by the variable keyboardBoundary, and are thereafter sectioned further to distinguish each key.
If a reported touch with a DOWN-event is positioned within the keyboardBoundary, a second look-up will be preformed in order to evaluate which key to print.
if (event == 0) { // DOWN event //assign Key to the given interval if (y < 250) Keyboard.print('A'); //Print Key "A" else if (y < 500) Keyboard.print('B'); //Print Key "B" else if (y < 750) Keyboard.print('C'); //Print Key "C" else if (y < 1000) Keyboard.print('D'); //Print Key "D" else Keyboard.print('E'); //Print Key "E" }